Wednesday, 13 May 2020

Python Tkinter GUI: Add Title, Icon and Geometry || Add Tkinter Window Close Button

Python Tkinter GUI: Add Title, Icon and Geometry || Add Tkinter ...

Python Tkinter GUI: Add Title, Icon and Geometry || Add Tkinter Window Close Button || Python tk
How to change Python Tkinter Title and Icon?
Set Python Tkinte Title and Icon!


Code:

import tkinter as tk
Window = tk.Tk()
Window.geometry("200x200")
Window.wm_iconbitmap('NH.ico')
Window.title("Label Tutorial")
button = tk.Button(Window, text="Close", command=exit)
button.grid(row=2, column=1)
Window.mainloop()


#Python
#Tkinte
#Title
#Icon
#Geometry
#Close_Button


Python Tkinter GUI: Add Scrollbar to Text Box || Insert Text Into Text B...

Python Tkinter GUI: Add Scrollbar to Text Box || Insert Text Into ...

Python Tkinter GUI: Add Scrollbar to Text Box || Insert Text Into Text Box | Python tk


Code:

import tkinter as tk
Window = tk.Tk()
Window.geometry("250x200")
frame = tk.Frame(Window, pady=10, padx=10)
frame.grid(row=0, column=0, sticky="nsew")
text = tk.Text(frame, width=25, height=6, font=("Times New Roman", 12))
text.grid(row=0, column=0, rowspan=6, columnspan=2, pady=5, padx=5)
scrollbar = tk.Scrollbar(frame, command=text.yview)
text['yscroll'] = scrollbar.set
scrollbar.grid(row=0, column=2, rowspan=6, sticky="ns")
quote =
"""HAMLET: To be, or not to be--that is the question: Whether 'tis nobler in the mind to suffer The slings and arrows of outrageous fortune Or to take arms against a sea of troubles And by opposing end them. To die, to sleep-- No more--"""
text.insert(tk.INSERT, quote)
button = tk.Button(frame, text="Close", fg="white", bg="red", command=exit)
button.grid(row=7, column=1)
Window.mainloop()


#Python
#Tkinter
#GUI
#Text_Box
#Scrollbar
#Insert_Text


Python Tkinter GUI: Reload / Refresh tk Label text || Python Tkinter refresh text

Python Tkinter GUI: Reload / Refresh tk Label text || Python ...
Python Tkinter GUI: Reload / Refresh tk Label text || Python Tkinter refresh text

How to reload text in label?
How to refresh text in label?
How to reload label?


Code:
import tkinter as tk
Window = tk.Tk()
Window.geometry("250x200")
Window.wm_iconbitmap('NH.ico')
Window.title("Label Tutorial")
label = tk.Label(Window, text="Insert your text: ")
label.grid(row=0, column=0, pady=5, padx=5)

entry = tk.Entry(Window)
entry.grid(row=0, column=1, pady=5, padx=5)
label1 = tk.Label(Window, text="Your text")
label1.grid(row=1, pady=5, padx=5)
def label_reload():
upText = entry.get()
label1.configure(text=upText)
label1.after(400, label_reload)
label_reload()
button = tk.Button(Window, text="Close", command=exit)
button.grid(row=2, column=1) Window.mainloop()


#Python
#Tkinte
#Label
#Reload
#text #Refresh


Python Tkinter GUI: Padding tk Label field || Python tk label customize

Python Tkinter GUI: Padding tk Label field || Python tk label ...


Python Tkinter GUI: Padding tk Label field || Python tk label customize

How to padding Python Tkinter label?
How to set Python Tkinte label padding?
how to add padding in tkinter?


Code:
import tkinter as tk
Window = tk.Tk()
Window.geometry("250x200")
Window.wm_iconbitmap('NH.ico')
Window.title("Label Tutorial")
label = tk.Label(Window, text="Insert your text: ")
label.grid(row=0, column=0, pady=5, padx=5)
entry = tk.Entry(Window)
entry.grid(row=0, column=1, pady=5, padx=5)
label1 = tk.Label(Window, text="Your text")
label1.grid(row=1, pady=5, padx=5)
Window.mainloop()

Python Tkinter GUI: Modify tk Label font name, color and size || Python tk label customize

Python Tkinter GUI: Modify tk Label font name, color and size ...
Python Tkinter GUI: Modify tk Label font name, color and size || Python tk label customize

How to change tkinter label font name and color?
How to set Python tkinter label font ?
How to set tkinter label background color?


Code:
import tkinter as tk
Window = tk.Tk()
label = tk.Label(Window, text="Hello ", bg="#000000", font=('Verdana', 14, 'bold'), fg="#fff")
label.pack()
label1 = tk.Label(Window, text="Hi, Web ", bg="#ccc", font=('Verdana', 14, 'bold'), fg="#fff")
label1.pack()
Window.mainloop()


#Python
#Tkinte
#Label
#font
#color
#font_size
#background

Python Tkinter GUI: Title, Icon and Geometry Setting || Python Tk

Python Tkinter GUI: Title, Icon and Geometry Setting || Python Tk ...
Python Tkinter GUI: Title, Icon and Geometry Setting


How to change Python Tkinter Title and Icon?
Set Python Tkinte Title and Icon!


Code:
import tkinter as tk
Window = tk.Tk()
Window.geometry("250x200")
Window.wm_iconbitmap('NH.ico')
Window.title("Label Tutorial")
Window.mainloop()


#Python
#Tkinte
#Title
#Icon
#Geometry

Monday, 27 April 2020

Java jFrame transfer data from one jFrame to another jFrame | Java Swing...

Java jFrame transfer data from one jFrame to another jFrame | Java Swing | Eclipse

Send data from one jFrame to another jFrame | Java Swing | Eclipse

Java jFrame transfer data from one jFrame to another jFrame | Java ...

#Send_Data

#Java_Swing

#Java_jFrame

#Window_Builder

#setVisible()

#Eclipse


Java Swing send data from one jFrame to another jFrame | Window Builder | Eclipse

Java Swing send data from one jFrame to another jFrame | Window Builder | Eclipse

Transfer data from one jFrame to another jFrame

Java Swing send data from one jFrame to another jFrame Window ...

 #Java_Swing
#Java_jFrame
#Window_Builder
#Send_Data
#Eclipse

Java jFrame Open one jFrame to another jFrame [setVisible() dispose()] | Java Swing | Eclipse

Java jFrame Open one jFrame to another jFrame [setVisible() dispose()] | Java Swing | Eclipse
Java Swing Call One Frame to Another Frame | Window Builder | Eclipse

Java jFrame Open one jFrame to another jFrame [setVisible ...

 #Java_Swing
#Java_jFrame
#Window_Builder
#setVisible()
#Eclipse

Java Swing open one jFrame to another jFrame [setVisible() dispose()] | Window Builder | Eclipse

Java Swing open one jFrame to another jFrame [setVisible() dispose()] | Window Builder | Eclipse
Java Swing Call One Frame to Another Frame | Window Builder | Eclipse


Java Swing open one jFrame to another jFrame [setVisible() dispose ...


#Java_Swing
#Java_jFrame
#Window_Builder
#setVisible()
#Eclipse

Tuesday, 27 October 2015

Adding a Google Map on Your Web Page


Some guys don't know hot to Add a Google Map on His Personal Web Page. Its very easy.

Firstly go "Google" and write 'Map' then open the 'Google Map' and write your place name. Now, above left side of Google Map page click 'Menu' button after click menu button you will watch a menu list then select "Share or embed map" option, then click 'Embed map' option and copy the link then paste the that on your Web page where you want to show that.

Bellow show the map:


Watch the Tutorial Video:


Practicing File Download link: Click Here

Example File View

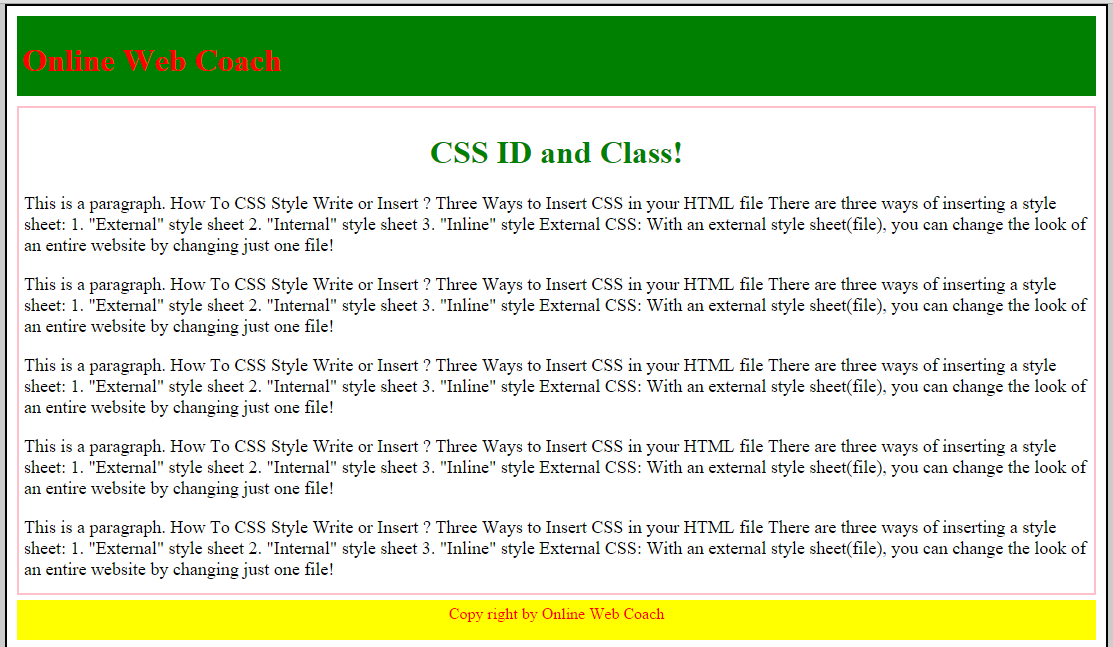
CSS ID and Class


CSS ID and Class its a bsic things of CSS. You must need to know about CSS ID and Class if you want to be a good designer.

CSS ID 

Its a uniqe part of division, thats mean its using DIV part of you HTML or Web page.

You can take CSS ID using any singel word/ name/ letter. 

CSS ID its declare with hash(#) tag its(#) take before your ID name [Such as #id_div{} ]

#header_div{
background-color: green;
width: auto;
padding:5px;
height:70px;
}

CSS Class

Its a uniqe part of division, its like child of CSS ID thats mean its using DIV part of you HTML or Web page.

You can take CSS Class using any singel word/ name/ letter. 

CSS Class its declare with dottet(.) tag its(.) take before your Class name [Such as .class_div{} ]

.post_div{
background-color: #fff;
width: auto;
margin-top:10px;
padding:5px;
border: 2px solid pink;
}

Watch Tutorial Video:


Example File Download Link: Click Here

Example Page View:

Friday, 5 June 2015

Inline CSS Style


An inline style it may be used to apply a unique style for a single element in HTML.

An inline CSS style loses many of the advantages of a CSS style sheet. Use this method sparingly!

To use inline CSS styles, add the style attribute to the relevant tag. The style attribute can contain any CSS property.

<h3 style="color:red; margin-left:40px;">This is a third heading.</h3>

Internal CSS Style


An internal style sheet it may be used if one single page has a unique style or different from other pages.

Internal CSS styles are defined within the <style> element it's start with <style> tag and end of with </style>, inside the head section of an HTML page:

<head>
<style>
body {
    background-color: green;
}

h1 {
    color: red;
    margin: auto;

</style>
</head>

External CSS Style Sheet


With an external style sheet(file), you can change the look of an entire website by changing just one file!

Each HTM page must be include a reference to the external CSS style sheet file inside the <link> element. The <link> element goes inside the <head> section:

<head>
<link rel="stylesheet" type="text/css" href="style-sheet.css">
</head>

you can write external style sheet in any text editor. The file should not contain any html tags. The style sheet file must be saved with a .css(style-sheet.css) extension. An example of a style sheet file called "style-sheet.css", is shown below:

body {
    background-color: green;
}

h1 {
    color: red;
    margin: auto;
}

How To CSS Style


How To CSS Style Write or Insert ?

Three Ways to Insert CSS in your HTML file
There are three ways of inserting a style sheet:

1. "External" style sheet
2. "Internal" style sheet
3. "Inline" style

External CSS:
With an external style sheet(file), you can change the look of an entire website by changing just one file!

<head>
<link rel="stylesheet" type="text/css" href="style-sheet.css">
</head>

Internal CSS:
An internal style sheet it may be used if one single page has a unique style or different from other pages.

<head>
<style>
body {
    background-color: green;
}

h1 {
    color: red;
    margin-left: auto;
}
</style>
</head>

Inline CSS:
An inline style it may be used to apply a unique style for a single element in HTML.


<h3 style="color:red; margin-left:40px;">This is a third heading.</h3>

CSS Selectors Style


CSS Selectors Style

CSS selectors allow you to select manipulate HTML elements (that you define).

Selectors are used to "find" or select HTML elements that based on  their id (#id_name), class (.class_name), type(element_type), attribute, and more other.

Element Selector
It's based on the element name.

You can select all paragraph <p> elements on a page like this: (all <p> elements will be center aligned, with a blue text color and font size 14 pixel)

p {
    text-align: center;
    color: blue;
    font-size:14px;
}

ID Selector
id selector uses to the whole block attribute of an HTML element to select a specific element.

To select an element with a specific id, write a hash(#) character (#id_name).

The style rule below will be applied to the HTML element with id="paragraph":

#paragraph {
    text-align: center;
    color: blue;
    font-size:14px;
}


Class Selector
Class selector uses to the whole block attribute of an HTML element to select a specific element.

To select elements with a specific class, write a period(.) character(.class_name), followed by the name of the class:

The style rule below will be applied to the HTML element with class="paragraph":

.paragraph {
    text-align: center;
    color: blue;
    font-size:14px;
}

Group selectors
you can group the selectors, to minimize the code.

To group selectors, each selector separate with a comma(,).

h1, h2, h3 {
    text-align: center;
    color: blue;
}

CSS Syntax Style

Two type of CSS Syntax:

1. Selector
2. Declaration
1. Property
2. Value

Selector:
Selector is HTML element that's you want to style.

Declaration:
Declaration block of contains({}) one or more declarations separated by semicolons(;). Declaration start with second bracket '{' and end of second bracket '}'.

Property & Value:
Each declaration includes a property name and a value, property and value separated by a colon(:).

CSS Style Introduction


What is CSS?

CSS mean "Cascading Style Sheets"
CSS defines how to be displayed are HTML elements in the pages External Style Sheets are stored in CSS files

"Before you know and should have a basic understanding of the HTML"

If you want to learn this subject first, find the tutorial on here "HTML".

CSS Solved a Big Problem
HTML was NEVER intended to contain tags for formatting a document.

HTML was intended to define the content of a document, like:

<h1>This is a first heading</h1>

<p>This is a first paragraph.</p>

CSS Saves a Lot of Work!
The style definitions are normally saved in external .css files.

With an external style sheet file, you can change the look of an entire Web site by changing just one file in you website!

Thursday, 3 July 2014

HTML Division !!


The Division is define <div> tag, the <div> tag defines a division or a section in an HTML document file.
The Division is the child of Body:
(
<body>
<div>
<p>This is my first HTML paragraph.</p>
</div>
</body>)
The Division tag has a start or opening tag <div> and an end or closing tag </div>. Div tag is very import for your web desingning or development.
This is support all HTML version, and support all Browser.

Example:
<p>This is some HTML text.</p>

<div style="color:#0000FF">
  <h3>This is a heading in a HTML div element</h3>
  <p>This is some text in a HTML div element.</p>
</div>

<p>This is some HTML text.</p>

Output:
This is some HTML text.

This is a heading in a HTML div element

This is some text in a HTML div element.
This is some HTML text.